Easter Dirt Cups, The Best Easter Dessert
Easter Dirt Cups: A Fun and Delicious Treat for Your Holiday Celebration
Table of Contents

Easter is a time for family, friends, and of course, delicious food! One of the most fun and visually appealing treats you can make for your Easter celebration is Easter Dirt Cups. These individual dessert cups are a delightful combination of chocolate pudding, crushed cookies, and gummy worms, making them a hit for both kids and adults alike. This simple and creative recipe is easy to prepare and perfect for any Easter-themed gathering.
In this article, we’ll walk you through the process of making Easter Dirt Cups, share some fun customization ideas, and give you some tips to ensure they turn out perfect every time. Let’s get started!
Key Ingredients and Their Roles in Easter Dirt Cups
Before diving into the recipe, it’s important to understand the role each ingredient plays in making Easter Dirt Cups the delicious and festive treat they are.
- Chocolate Pudding – The creamy, rich base of your Dirt Cups. It provides a smooth texture and a chocolatey flavor that pairs perfectly with the other ingredients.
- Crushed Oreo Cookies – These mimic the “dirt” layer in your cups. They add a crunchy texture that contrasts beautifully with the soft pudding. You can also use chocolate wafer cookies if you prefer.
- Gummy Worms – A fun and playful addition, gummy worms create the illusion of worms wriggling through dirt, making them a perfect Easter touch.
- Whipped Topping – Whipped cream or whipped topping adds a light, airy texture on top and helps balance out the richness of the pudding.
- Butter – A small amount of melted butter helps bind the crushed cookies together, enhancing the texture and flavor of the dirt layer.
Preparation Time
- Prep Time: 15 minutes
- Chill Time: 2 hours (recommended for best results)
- Total Time: 2 hours 15 minutes
While this recipe doesn’t require much hands-on time, it’s essential to let the Dirt Cups chill in the fridge for at least 2 hours to allow the flavors to meld together.
Ingredients for Easter Dirt Cups
Here’s everything you’ll need to make these fun Easter treats:
- 1 box (3.9 oz) instant chocolate pudding mix
- 2 cups cold milk
- 1 pack of Oreo cookies (about 15-20 cookies)
- 1 container (8 oz) whipped topping (Cool Whip)
- 6-8 gummy worms (for decoration)
- 2 tablespoons melted butter
Step-by-Step Cooking Instructions with Expert Tips
Now that you have your ingredients ready, let’s walk through the process of making Easter Dirt Cups.
Step 1: Prepare the Chocolate Pudding
- In a medium-sized bowl, combine the instant chocolate pudding mix and cold milk.
- Whisk together for about 2 minutes until the mixture thickens to the consistency of pudding.
- Set the pudding aside to allow it to set while you prepare the rest of the ingredients.
Expert Tip: For an extra creamy texture, use whole milk instead of skim milk. This will give your pudding a richer flavor and a smoother consistency.
Step 2: Crush the Oreo Cookies
- Take the Oreo cookies and place them in a large resealable plastic bag. Seal the bag and use a rolling pin or something heavy to crush the cookies into fine crumbs. Aim for a texture that resembles dirt.
- Once you’ve crushed the cookies, transfer them to a large bowl and mix in the melted butter. Stir well to ensure the crumbs are coated in butter.
Expert Tip: If you don’t have a rolling pin, you can crush the cookies in a food processor or by hand, but be careful not to turn them into dust. You want some texture!
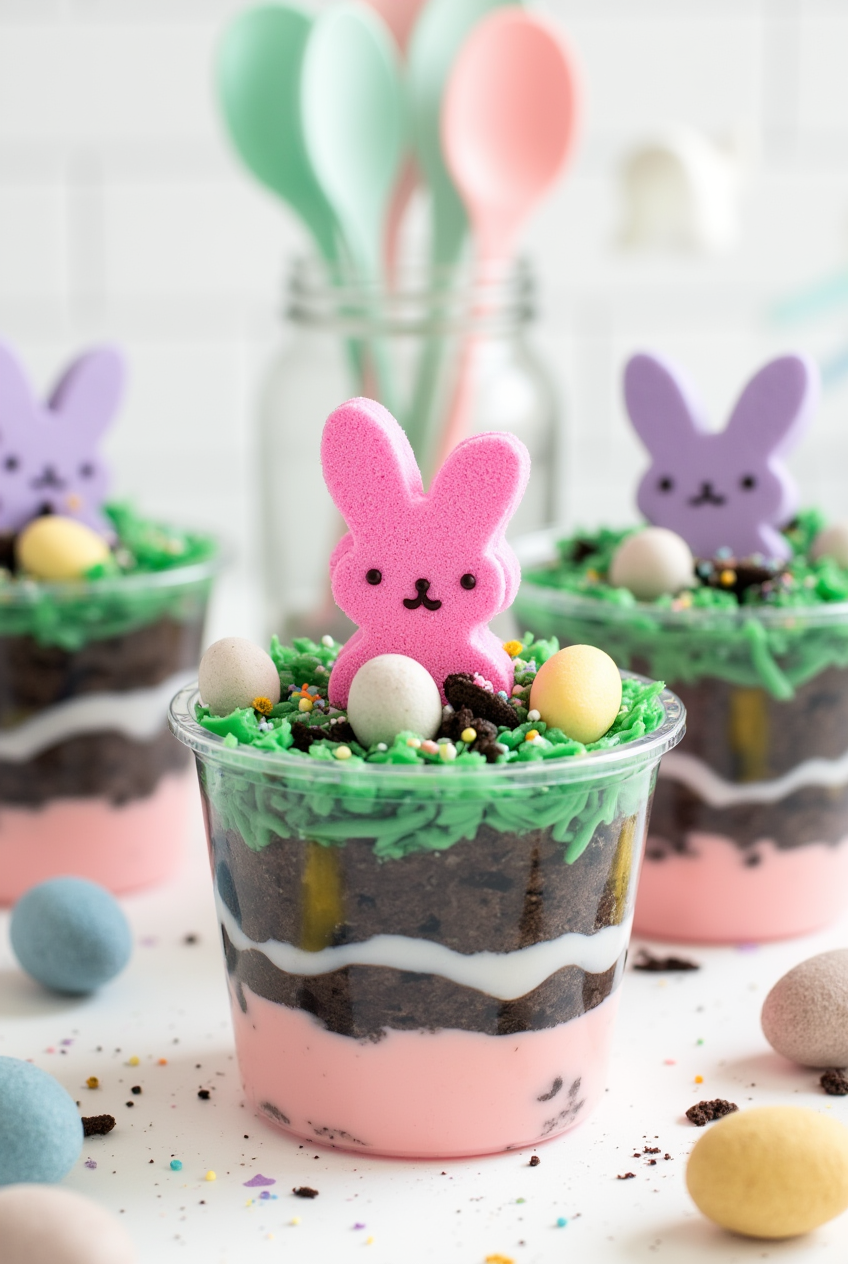
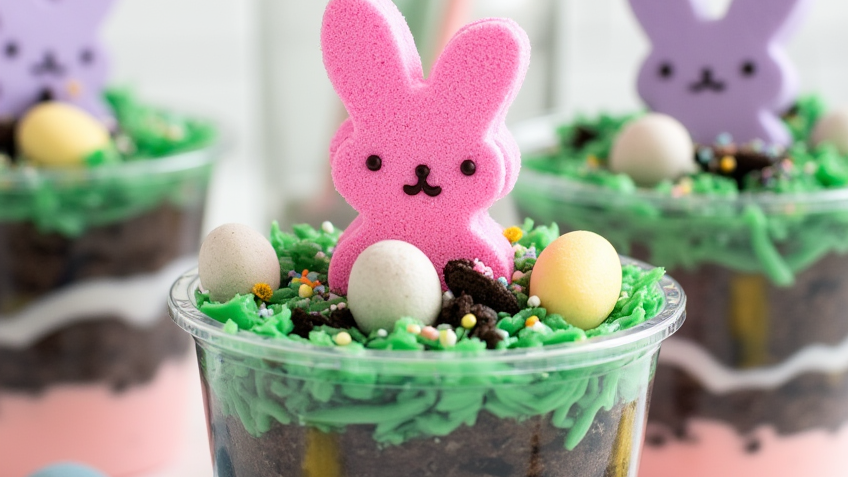
Step 3: Assemble the Easter Dirt Cups
- Grab 4-6 small cups (clear plastic cups work great for visual appeal).
- Spoon a layer of chocolate pudding into the bottom of each cup, filling about one-third of the cup.
- Add a generous layer of the crushed Oreo mixture on top of the pudding. Press it down slightly so it sticks and forms the “dirt” layer.
- Add another layer of chocolate pudding on top of the cookie crumbs. Be sure to leave some room at the top for the whipped topping.
- Top each cup with a dollop of whipped topping for a creamy finish.
Expert Tip: If you want your cups to look extra fancy, pipe the whipped topping using a piping bag for a decorative swirl.
Step 4: Add the Gummy Worms
- Place 1-2 gummy worms on top of each cup to complete the look. You can arrange them to look like they’re “crawling” out of the dirt, which adds a playful touch.
Expert Tip: For a more fun look, you can slightly bend the gummy worms so they appear to be emerging from the dirt at different angles.
Step 5: Chill and Serve
- Place the assembled cups in the fridge and let them chill for at least 2 hours before serving. This allows the pudding to firm up, the flavors to meld, and the dirt to set.
- Once ready, serve and enjoy!
Presentation Tips for Easter Dirt Cups
Presentation is everything when it comes to food, and Easter Dirt Cups are no exception! Here are some creative tips to elevate your presentation:
- Colorful Garnishes: To make your cups stand out, consider adding sprinkles in pastel colors (think Easter-themed pastel pink, yellow, and blue) or a few small edible flowers on top of the whipped cream.
- Decorative Containers: Instead of using standard cups, you could use mason jars or small flower pots for a more Easter-inspired touch.
- Mini Easter Eggs: You can also decorate the top of each cup with mini chocolate Easter eggs to enhance the Easter vibe.
Creative Twists on Easter Dirt Cups
While the classic version of Easter Dirt Cups is always a hit, there are many fun ways to put your unique spin on this dessert. Here are a few creative twists:
- Carrot Cake Dirt Cups: Swap out the chocolate pudding for a delicious carrot cake-flavored pudding or add small bits of carrot cake between the layers of dirt.
- Peanut Butter Dirt Cups: Add a layer of peanut butter or peanut butter cups in between the pudding layers for an extra kick of flavor.
- Fruit Layers: Mix fresh fruit into the pudding layers—strawberries, blueberries, or even kiwi could make for a colorful and fresh addition.
Pro Tip for Customization
For an extra layer of flavor, consider adding a drizzle of caramel or chocolate syrup on top of the whipped topping before serving. This will give the Dirt Cups a bit of extra sweetness and make them even more irresistible.
Frequently Asked Questions (FAQs)
- Can I make Easter Dirt Cups in advance? Yes! Easter Dirt Cups can be made up to 24 hours ahead of time. In fact, chilling them overnight will help the flavors meld together. Just be sure to cover them tightly with plastic wrap before refrigerating.
- Can I use homemade pudding instead of instant pudding? Absolutely! Homemade chocolate pudding can be used in place of instant pudding for a richer, more decadent flavor. Just be sure to let it cool and thicken before layering it in your cups.
- What can I use instead of gummy worms? If gummy worms aren’t your thing, you can substitute with other Easter-themed candy, such as jelly beans, mini chocolate bunnies, or candy flowers.
- How can I make the dirt cups gluten-free? To make these cups gluten-free, use gluten-free cookies like gluten-free Oreos, or opt for gluten-free graham crackers. The rest of the ingredients are naturally gluten-free.
- Can I use regular whipped cream instead of whipped topping? Yes! Fresh whipped cream can be used in place of Cool Whip for a more homemade touch. Just be sure to whip it to stiff peaks before using.
Conclusion
Easter Dirt Cups are a fun, easy, and delicious dessert that will surely be the star of your Easter celebration. With their simple ingredients, customizable options, and playful presentation, they’re sure to delight everyone at your table. Whether you stick to the classic version or get creative with different flavors and toppings, these dirt cups are a must-try this Easter season.
So, gather your ingredients, have fun assembling these adorable cups, and watch as your guests devour them with smiles on their faces. Happy Easter!
If you like it, Leave a Comment !
There are no reviews yet. Be the first one to write one.