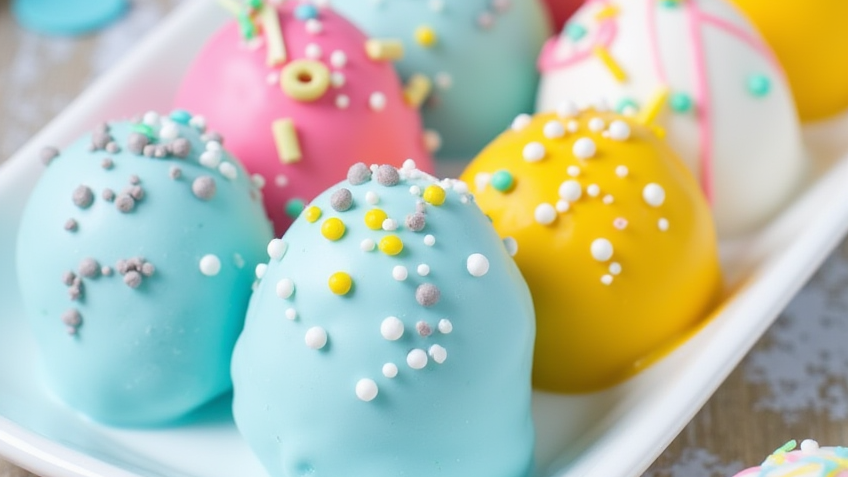
Easter Egg Oreo Balls
Easter Egg Oreo Balls
Table of Contents

Easter Egg Oreo Balls are a fun, festive, and delicious spring dessert treat that will be a hit at any Easter gathering. These no-bake chocolate-covered Oreo truffles are shaped like Easter eggs, making them a perfect addition to holiday dessert tables. They are rich, creamy, and easy to make with just a few simple ingredients.
If you’re looking for an easy Easter treat that both kids and adults will love, Easter Egg Oreo Balls are the perfect choice. They require minimal effort, can be customized with different chocolate coatings and decorations, and are great for gifting or serving at Easter parties.
In this article, we’ll go over everything you need to know about making the perfect Easter Egg Oreo Balls—including the key ingredients, preparation time, step-by-step instructions, expert tips, presentation ideas, creative twists, and answers to frequently asked questions.
Key Ingredients and Their Roles
1. Oreo Cookies
Oreo cookies are the base of this recipe. They provide a rich chocolate flavor and a soft, fudgy texture when crushed and mixed with cream cheese.
2. Cream Cheese
Cream cheese is essential for binding the Oreo crumbs together, creating a smooth and creamy truffle filling. It also adds a slight tanginess that balances the sweetness of the chocolate coating.
3. White Chocolate or Candy Melts
White chocolate or candy melts are used for coating the Oreo balls. They provide a smooth, sweet, and creamy outer shell. White chocolate pairs perfectly with the Oreo filling, and it can be dyed with food coloring to create colorful Easter egg designs.
4. Food Coloring
Food coloring helps achieve beautiful pastel hues for Easter eggs. Gel food coloring works best because it provides vibrant colors without altering the consistency of the chocolate.
5. Sprinkles and Decorations
Easter-themed sprinkles, colored sugar, or edible glitter add a festive touch to the finished Oreo balls, making them look just like decorated Easter eggs.
6. Coconut Oil (Optional)
A small amount of coconut oil can be added to the melted chocolate to create a smoother, shinier coating that’s easier to work with.
Preparation Time
- Prep Time: 20 minutes
- Chilling Time: 1 hour
- Total Time: 1 hour 20 minutes
Ingredients
- 36 Oreo cookies (1 standard package)
- 8 oz cream cheese, softened
- 12 oz white chocolate or white candy melts
- Gel food coloring (pastel colors such as pink, blue, yellow, and green)
- Easter-themed sprinkles or colored sugar
- 1 tablespoon coconut oil (optional, for smooth melting)
Step-by-Step Cooking Instructions
Step 1: Crush the Oreo Cookies
- Place the Oreo cookies in a food processor and pulse until they turn into fine crumbs. If you don’t have a food processor, place the cookies in a zip-top bag and crush them with a rolling pin.
- Make sure the crumbs are evenly crushed with no large chunks.
Step 2: Mix with Cream Cheese
- In a large mixing bowl, combine the crushed Oreos with the softened cream cheese.
- Use a spoon or your hands to mix until a smooth dough forms. The mixture should be moist and hold together easily.
Step 3: Shape into Easter Eggs
- Line a baking sheet with parchment paper.
- Scoop about 1 tablespoon of the Oreo mixture and roll it into an oval egg shape.
- Place the shaped Oreo balls on the parchment-lined baking sheet.
- Once all the Oreo balls are shaped, refrigerate for at least 30 minutes to firm up.
Step 4: Melt the White Chocolate
- In a microwave-safe bowl, melt the white chocolate or candy melts in 30-second intervals, stirring between each interval until smooth.
- If the chocolate is too thick, stir in a teaspoon of coconut oil to make it easier to coat the Oreo balls.
- Divide the melted chocolate into separate bowls and add a few drops of gel food coloring to each, stirring until fully combined.
Step 5: Coat the Oreo Balls
- Remove the Oreo balls from the refrigerator.
- Using a fork or dipping tool, dip each Oreo egg into the colored chocolate, coating it evenly. Let any excess drip off before placing it back on the parchment paper.
- Work quickly to ensure a smooth coating before the chocolate hardens.
Step 6: Decorate the Easter Egg Oreo Balls
- While the chocolate is still wet, sprinkle the Oreo balls with Easter-themed decorations such as sprinkles or colored sugar.
- For a more detailed design, drizzle a different colored chocolate over the eggs to create stripes, zigzags, or polka dots.
Step 7: Let the Chocolate Set
- Place the decorated Oreo balls back in the refrigerator for at least 30 minutes to allow the chocolate to harden completely.
Step 8: Serve and Enjoy
- Once set, your Easter Egg Oreo Balls are ready to enjoy. Serve them on a festive Easter platter or package them in decorative boxes for gifting.
Expert Tips
- Use Room Temperature Cream Cheese: This ensures easy mixing and a smooth, creamy filling.
- Chill Before Coating: Refrigerating the Oreo balls before dipping helps them hold their shape when coated in melted chocolate.
- Melt Chocolate Slowly: Overheating chocolate can cause it to seize. Always melt in short intervals and stir frequently.
- Use a Fork for Dipping: This helps remove excess chocolate and keeps the coating smooth.
Presentation Tips
- Easter Basket Display: Place the Oreo balls in a mini Easter basket lined with pastel-colored tissue paper.
- Decorative Egg Cartons: Arrange the Oreo balls in a clean, colorful egg carton for a fun Easter egg look.
- Personalized Designs: Use icing pens to draw cute patterns, flowers, or polka dots on each egg.
- Gift Packaging: Wrap the Oreo balls in clear cellophane bags tied with pastel ribbons for a perfect Easter gift.
Creative Twists
- Chocolate Lover’s Version: Use milk or dark chocolate for the coating instead of white chocolate.
- Peanut Butter Filling: Mix a tablespoon of peanut butter into the Oreo-cream cheese mixture for a nutty twist.
- Speckled Egg Effect: Flick a little cocoa powder or food coloring onto the chocolate coating for a speckled egg look.
- Flavored Oreos: Try different Oreo flavors like Golden Oreos or Mint Oreos for a unique taste.
Pro Tip for Customization
For a fun interactive Easter activity, set up a DIY Oreo Ball Decorating Station where kids (and adults) can dip and decorate their own Easter egg Oreo balls with different toppings and colors.
Frequently Asked Questions about “Easter Egg Oreo Balls”
1. How long do Easter Egg Oreo Balls last?
They can be stored in an airtight container in the refrigerator for up to 5 days.
2. Can I freeze “Easter Egg Oreo Balls“?
Yes! Freeze them in a sealed container for up to 3 months. Let them thaw in the refrigerator before serving.
3. Can I use homemade frosting instead of cream cheese?
Cream cheese works best for binding the mixture, but you can try a thick buttercream frosting as an alternative.
4. Do I have to use white chocolate?
No, you can use any chocolate or candy melts in different colors.
5. Can I make these in advance?
Yes! These are perfect for making a day or two ahead of time before your Easter gathering.
Conclusion
Easter Egg Oreo Balls are the ultimate festive treat for Easter. They are fun to make, easy to customize, and deliciously rich and creamy. Whether you serve them at an Easter party, give them as gifts, or enjoy them with family, they’re sure to be a holiday favorite. Try different variations, get creative with decorations, and most importantly—have fun making these delightful Easter treats!
If you like it, Leave a Comment !
There are no reviews yet. Be the first one to write one.